Blue-Green 무중단 배포 구현하기
들어가며
처음 개인 블로그 프로젝트를 운영하면서 배포할 때마다 서비스가 중단되는 문제가 있었습니다. 이때 블로그가 정상 작동하지 않아 이 문제를 해결하기 위해 Blue-Green 배포 방식을 도입했습니다.
프로젝트 구성
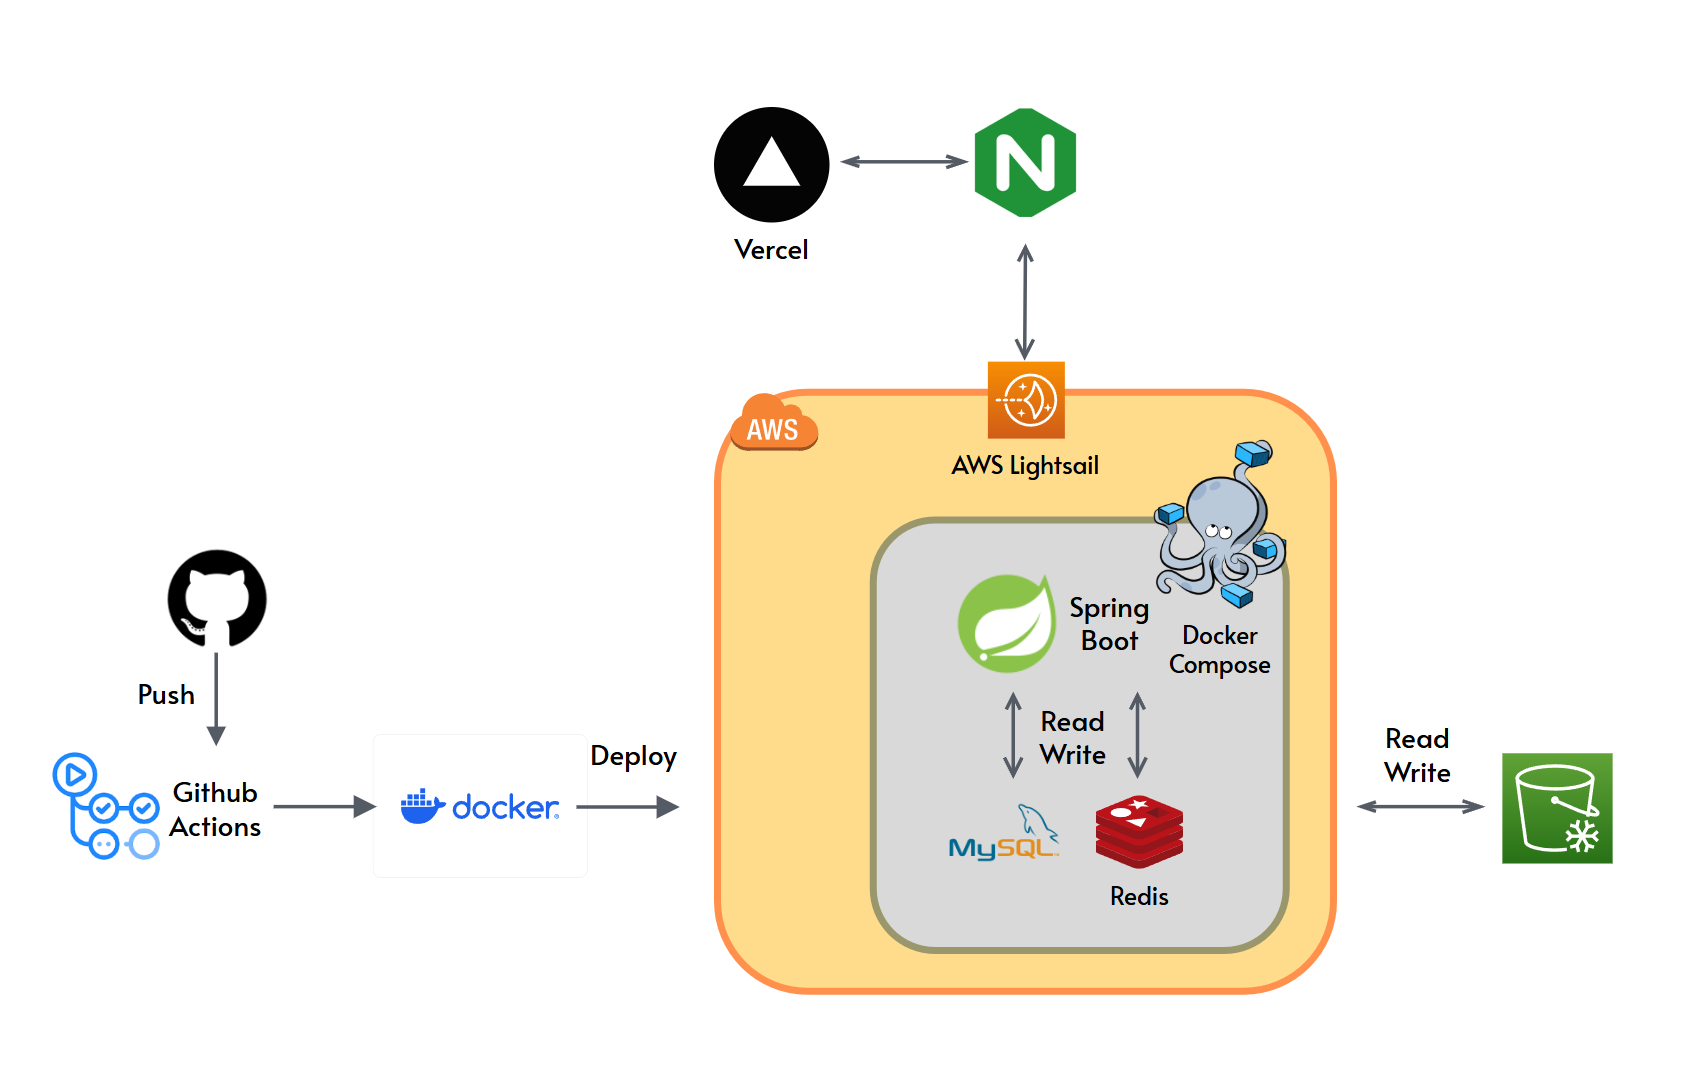
먼저 현재 프로젝트의 아키텍처를 간단히 소개하겠습니다.
- 프론트엔드: Next.js (Vercel 호스팅, HTTPS)
- 백엔드: Spring Boot (AWS Lightsail, Docker Compose)
- 데이터베이스: MySQL 8.0
- 캐시: Redis
- 리버스 프록시: Nginx
프론트엔드와 백엔드가 분리되어 있고, 각각 다른 저장소에서 관리됩니다. 프론트엔드는 Vercel에서 자동 배포되고, 백엔드는 Lightsail 인스턴스에서 직접 관리합니다.
Blue-Green 배포란?
Blue-Green 배포는 두 개의 동일한 프로덕션 환경을 유지하면서 무중단 배포를 구현하는 방식입니다.
- Blue 환경: 지금 프로덕션 트래픽을 처리하는 환경
- Green 환경: 이후 새 버전을 배포할 대기 환경
배포 과정은 다음과 같습니다:
- Green 환경에 새 버전 배포
- Green 환경 health check
- Nginx upstream을 Green으로 전환
- 문제 발생 시 즉시 Blue로 롤백
이 방식의 장점은 빠른 롤백이 가능하고, 트래픽을 서버 다운 없이 바로 전환할 수 있다는 점입니다.
Docker Compose 구조 설계
Blue-Green 배포를 위해 Docker Compose 파일을 다음과 같이 분리했습니다.
1. 공유 서비스 (docker-compose.yml)
MySQL과 Redis는 Blue와 Green 환경에서 공유합니다. 데이터베이스를 분리하면 데이터 동기화 문제가 발생할 수 있기 때문입니다.
services:
  mysql:
    image: mysql:8.0
    container_name: blog-mysql
    # ...
  redis:
    image: redis:7-alpine
    container_name: blog-redis
    # ...
networks:
  blog-network:
    external: true
    # ...
2. Blue 환경 (docker-compose.blue.yml)
services:
  backend-blue:
    build:
      context: .
      dockerfile: Dockerfile
    image: blog-backend:${IMAGE_TAG:-latest}
    container_name: blog-backend-blue
    environment:
      - SPRING_PROFILES_ACTIVE=prod
      - ENV_COLOR=blue
      # ... 기타 환경 변수
    ports:
      - "127.0.0.1:8081:8080"
    volumes:
      - ./logs/blue:/app/logs
    healthcheck:
      test: ["CMD", "curl", "-f", "http://localhost:8080/actuator/health"]
      interval: 10s
      timeout: 5s
      retries: 2
      start_period: 30s
    networks:
      - blog-network
    restart: unless-stopped

networks:
   blog-network:
    external: true
Blue 환경은 8081 포트에 바인딩됩니다. 127.0.0.1:8081:8080으로 설정해서 외부에서 직접 접근할 수 없게 했습니다.
모든 트래픽은 Nginx를 통해서만 접근 가능합니다.
3. Green 환경 (docker-compose.green.yml)
Green 환경은 Blue와 거의 동일하지만, 포트와 환경 변수만 다릅니다.
services:
  backend-green:
    # ... (Blue와 동일한 설정)
    container_name: blog-backend-green
    ports:
      - "127.0.0.1:8082:8080"  # 다른 포트
    volumes:
      - ./logs/green:/app/logs
4. Nginx (docker-compose.nginx.yml)
services:
  nginx:
    build:
      context: ./nginx
      dockerfile: Dockerfile
    image: blog/nginx:latest
    container_name: blog-nginx
    ports:
      - "80:80"
      - "443:443"
    volumes:
      - ./nginx/conf.d:/etc/nginx/conf.d
      - nginx_logs:/var/log/nginx
      - ./nginx/ssl:/etc/nginx/ssl:ro
    networks:
      - blog-network
    restart: unless-stopped

networks:
  blog-network:
    external: true

volumes:
  nginx_logs:
    driver: local
Nginx는 외부와 통신하는 컨테이너입니다. SSL 인증서도 여기서 관리합니다.
Nginx 설정
Nginx는 Blue와 Green 환경 사이에서 트래픽을 전환하는 핵심 역할을 합니다.
Upstream 설정
Blue와 Green 각각의 upstream 설정 파일을 만듭니다.
nginx/conf.d/upstream-blue.conf
upstream backend {
    server blog-backend-blue:8080 max_fails=3 fail_timeout=30s;
    keepalive 32;
}
nginx/conf.d/upstream-green.conf
upstream backend {
    server blog-backend-green:8080 max_fails=3 fail_timeout=30s;
    keepalive 32;
}
nginx/conf.d/active-upstream.conf : 현재 활성 환경을 가리킴 (Blue 또는 Green 이 복사됨)
서버 설정
nginx/conf.d/default.conf
# HTTP to HTTPS 리다이렉트
server {
    listen 80;
    server_name mydomain.com localhost _;

    location /health {
        access_log off;
        return 200 "healthy\n";
        add_header Content-Type text/plain;
    }

    # 나머지는 HTTPS로 리다이렉트
    location / {
        return 301 mydomain.com$request_uri;
    }
}

# HTTPS 설정
...
}
배포 스크립트 구현
1. Health Check 스크립트
scripts/deploy/health-check.sh
#!/bin/bash

set -e

TARGET_ENV=$1

if [ "$TARGET_ENV" = "blue" ]; then
    BACKEND_PORT=8081
else
    BACKEND_PORT=8082
fi

BACKEND_URL="http://localhost:${BACKEND_PORT}/actuator/health"

MAX_RETRIES=20
RETRY_INTERVAL=2
TIMEOUT=3
# ...
배포 시간이 너무 길어지고 Blue와 Green이 동시에 실행되면서 인스턴스에 과부하가 걸린 문제가 있어 재시도 수를 20회로 줄여서 최대 40초 안에 실패를 감지하도록 개선했습니다.
2. 메인 배포 스크립트
scripts/deploy/blue-green-deploy.sh
#!/bin/bash

...
# 타겟 환경 결정
if [ "$ACTIVE_ENV" = "blue" ]; then
    TARGET_ENV="green"
else
    TARGET_ENV="blue"
fi

cd "$PROJECT_DIR"

# 타겟 환경 컨테이너 시작
docker compose -f docker-compose.yml -f docker-compose.${TARGET_ENV}.yml up -d

# Health check
...

# Upstream 전환
...

# 성공
echo "Previous : ${ACTIVE_ENV}"
echo "New:      ${TARGET_ENV}"

exit 0
GitHub Actions 작동
deploy_V1
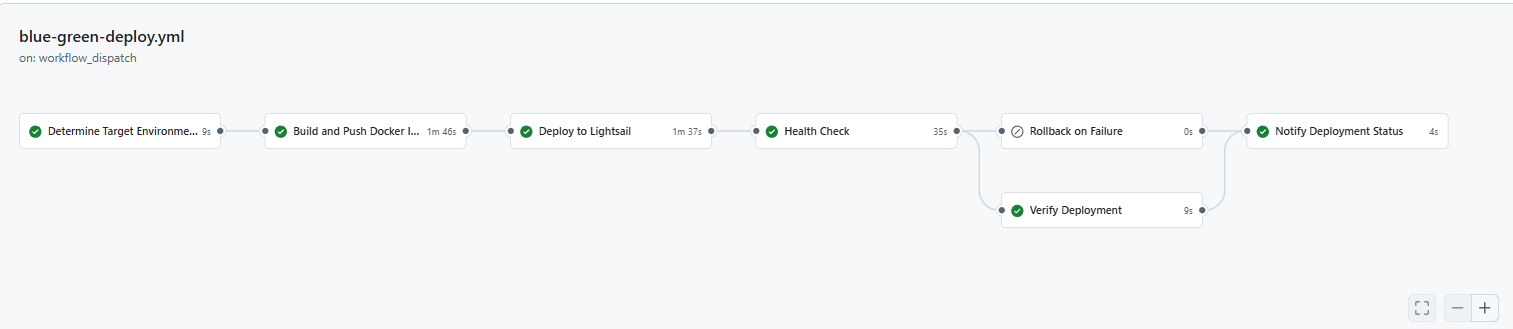
deploy_V2 (업데이트)
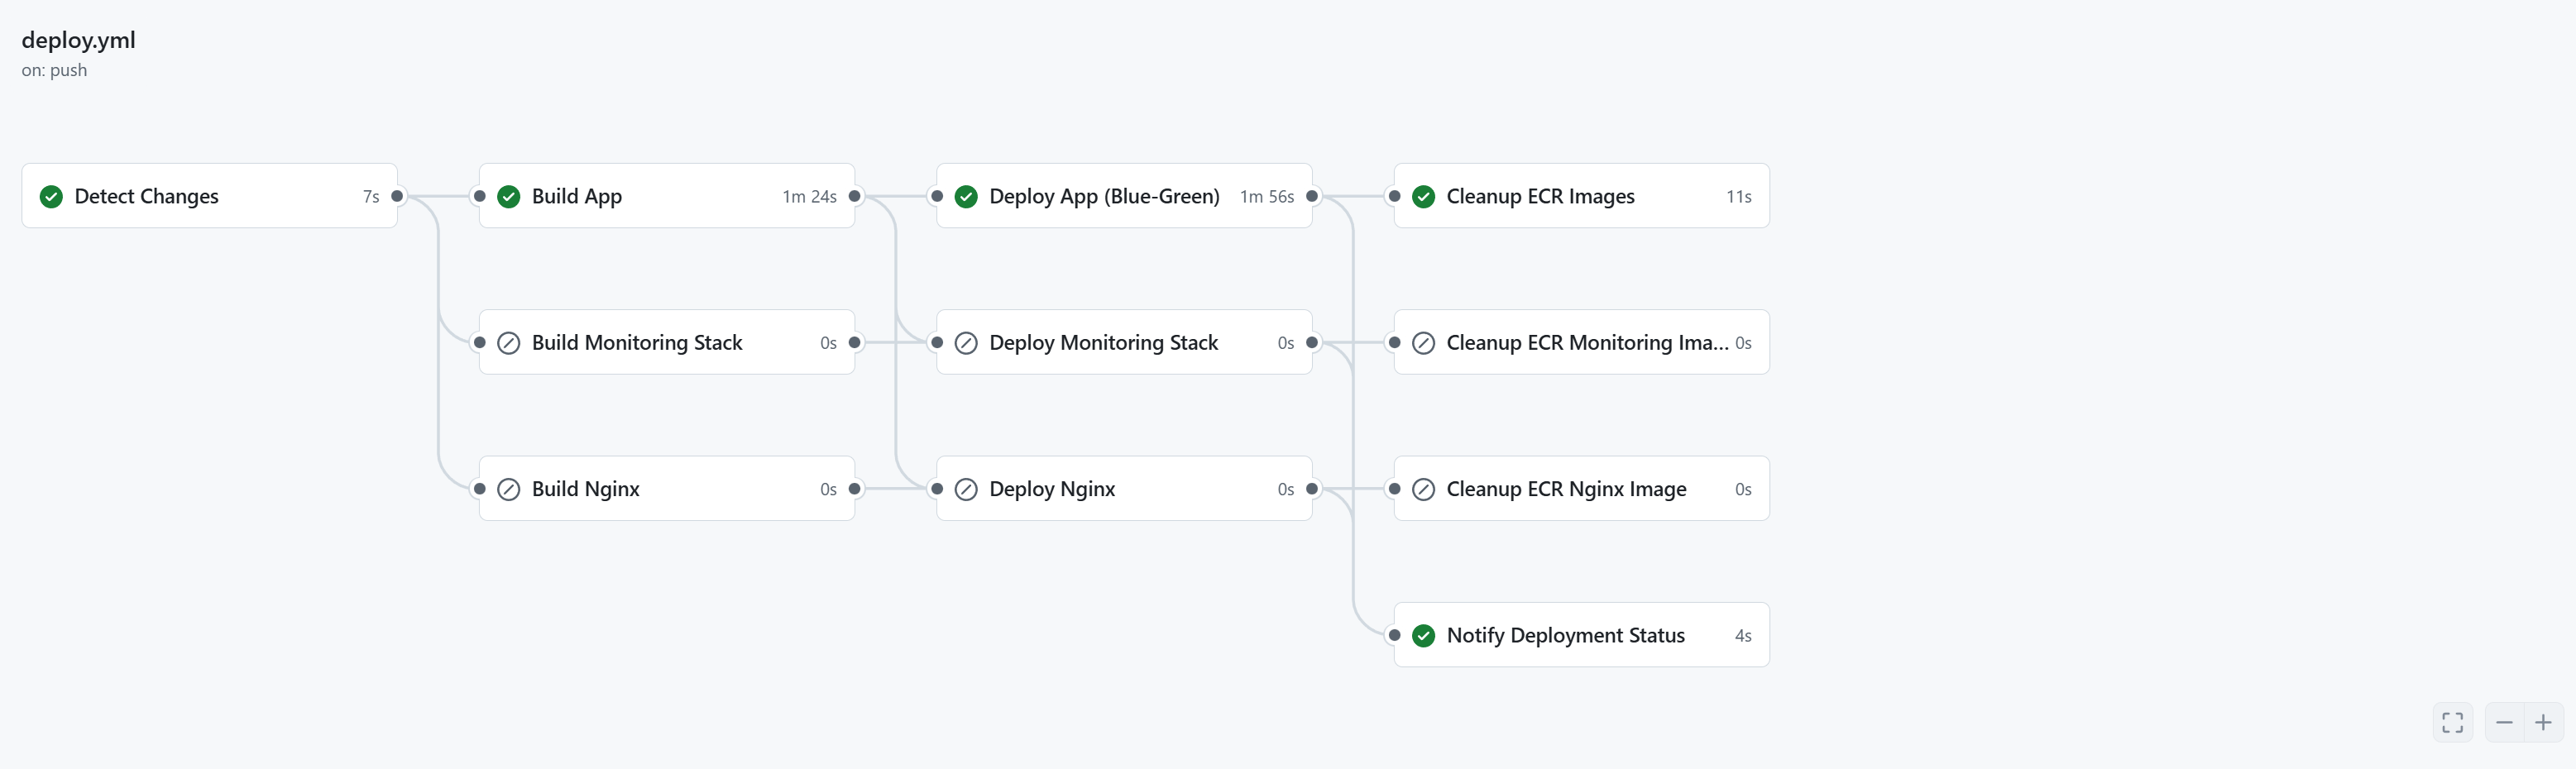
Docker

결론
Blue-Green 배포를 구현하면서 많은 문제가 있었지만 무중단 배포 시스템을 구축할 수 있었습니다.
현재 시스템으로 약 3분 정도에 무중단 배포가 가능하고, 문제 발생 시 30초 내로 롤백할 수 있습니다. 이후에는 Promeheus + Grafana를 이용핸 로그/모니터링을 추가해서 더 완성도 높은 CI/CD 파이프라인을 만들 계획입니다.